Wednesday, October 28, 2009

Chili with Cornbread


Chili with Cornbread

You will Need:
Chili-
1 large onion, diced

1 lb ground beef
1 head garlic, minced
1 red bell pepper, diced into ½” pieces
2- 28oz. cans diced tomatoes
3- 14oz. cans beans (assortment)
1 can green chilies, minced
2 chili seasoning packets
1 ½ cups frozen corn
Cornbread-
1 ½ cups cornmeal

2 ½ cups milk
2 cups flour
1 tablespoon baking powder
1 teaspoon salt
2/3 cup sugar
2 eggs
½ cup vegetable oil


To make the Chili-

Sauté onions on high heat in a few tablespoons oil until translucent.


Add the ground beef and minced garlic and cook until the beef is no longer pink.


Add the bell pepper and cook for about 2 minutes. Add 1 packet of seasoning and cook for an additional minute.


Add the tomatoes, beans, chilies and the second seasoning packet. Stir together and cook on medium heat for about 30 minutes, stirring occasionally. Add the corn during the last 10 minutes of cooking.


Serve with sour cream, shredded cheese and/or onions.


To make the Cornbread-

Combine the cornmeal and milk and let stand for 5-10 minutes.


In a separate bowl whisk together flour, baking powder, salt and sugar.


Mix in the cornmeal mixture, eggs and oil. Stir until smooth


Pour batter into a greased 9x13 pan.

Bake in a 400 degree oven for 30-35 minutes or until a toothpick inserted in the center comes out clean.


Serve alongside a bowl of chili with a pat of butter.
Enjoy!


Monday, October 26, 2009

Chai Spice Cookies with Vanilla Bean Icing


Chai Spice Cookies with Vanilla Bean Icing

I created these cookies because my favorite thing to get at Starbucks is a chai latte, it's like pumpkin pie in a drink.  And what better way to top a yummy cookie than with a yummy frosting!  I'm still working with the measurements on the spices so try it out and let me know what you think.

You Will Need-
4 ½ cups flour
4 teaspoons baking powder
1 teaspoon salt
2 teaspoons pumpkin pie spice
¼ teaspoon ground cardamom
1 cup (2 sticks) unsalted butter, room temperature
2 cups sugar
2 eggs
½ cup milk
1 ½ teaspoons vanilla extract
Icing
2 cups powdered sugar
¼ cup milk
½ lemon
½ teaspoon vanilla extract
½ vanilla bean pod


Cream the butter and sugar until fluffy.


Add the dry ingredients, 1 cup at a time, alternating with the milk and vanilla, beating well after each addition.


Cut the chilled dough into ¼ inch rounds and place on a baking sheet.


Bake at 375 degrees for 8-10 minutes. Cool on a rack.


While the cookies are cooling make the icing. 
Put the powdered sugar into a bowl.  Sqeeze in the lemon and 2 tablespoons of the milk.  Slice open the vanilla bean and scrape out the seeds with the backside of your knife.  Whisk everything together.  Add more milk as necessary, 1 teaspoon at a time, to get the desired consistency.


Frost the cooled cookies with the vanilla bean icing.  If you let the cookies sit for at least an hour the icing will harden up slightly.  I've heard that you can put powdered egg whites in the icing to make it harden up more, but I've never tried it.  If you have, please let me know your thoughts on it. 
Enjoy!


Put ½ the dough on a piece of plastic wrap and form into a log using the plastic. Do the same with the other ½ of the dough. Refrigerate for at least an hour, 2 is better.

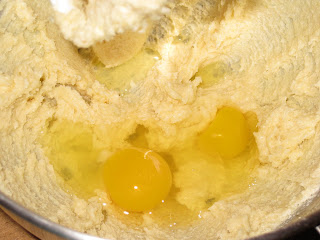
Add the eggs and beat well.

Sift together dry ingredients.


Cranberry Streusel Bars


Cranberry Streusel Bars

I got this recipe from the Food Day section of the Oregonian.  This is one of my sister's favorites and when it comes time for the cranberries to fill the stores, I can't make enough.


You Will Need-

Filling:
1 – 12 oz. bag fresh or frozen cranberries (3 ½ cups)
¾ cup water
1 cup granulated sugar
Pinch salt
¼ teaspoon ground mace
Bars:
1 cup firmly packed brown sugar
1 ¾ cups all purpose flour
½ teaspoon baking soda
½ teaspoon salt
½ teaspoon ground cinnamon
¾ cup unsalted butter, room temperature
1 ½ cups old fashioned oatmeal
½ cup chopped walnuts


To make filling:

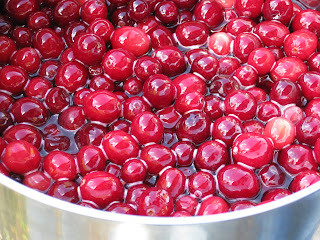
In a medium saucepan, combine the cranberries (no need to thaw berries if frozen), the water and sugar.


Bring to a boil over high heat, then reduce to a simmer. Cook stirring occasionally until the mixture thickens and the cranberries pop, about 5 minutes. Remove from heat and stir in the salt and mace. Mixture will thicken as it cools.


To make bars:

Preheat oven to 375 degrees. Grease a 7-by-11-inch pan and set aside.

In a large bowl combine the brown sugar, flour, baking soda, salt and cinnamon. Add the butter and, using your fingers, work together until no small lumps remain.


Add the oatmeal
Press and flatten half of the mixture into the prepared pan to form a crust. Bake for 10 minutes.


Remove the crust from the oven and, while warm, spread on top of it all of the cranberry filling.


Add the nuts to the remaining mixture for the streusel and sprinkle it evenly over the filling.


Return to the oven and bake 25 minutes, until streusel topping is lightly browned.


Cool pan on rack and cut into bars.
Enjoy!


Monday, October 12, 2009

Lentil Soup with Beef


Lentil Soup with Beef


It's starting to get into the colder months of Fall which always seems to call for a hearty, warm soup to curl up on the couch with.  I saw Giada make this recipe on her show and it looked so good!  I've changed a few things here and there.

You will need-

1 pound beef chuck, cut into 1/2-inch cubes
Salt and freshly ground black pepper
3 large celery stalks, chopped
3-4 large carrots, peeled and chopped
1 large onion, chopped
6 garlic cloves, minced
1 1/2 teaspoons fresh rosemary leaves, finely minced
1 1/2 teaspoons dried oregano
84 oz. (10 1/2 cups) beef broth
1 (28-ounce) can diced tomatoes in juice
2 cups (about 11 ounces) lentils, rinsed
Parmesan for topping


Heat the oil in heavy large pot over medium-high heat.
Sprinkle the beef with salt and pepper. Add the beef and cook until brown, about 8 minutes. Using a slotted spoon, transfer the beef to a bowl.


Add the celery, carrots, onion, garlic, rosemary, and oregano to the pot. Saute until the onions are translucent, about 8 minutes.


Return the beef and any accumulated juices from the bowl to the pot.

Add the broth and tomatoes with their juice.


Bring the soup to a boil. Reduce the heat to medium-low. Cover and simmer until the meat is just tender, stirring occasionally, about 30 minutes.

Add the lentils. Cover and continue simmering until the lentils are tender, about 40 minutes.

Season the soup, to taste, with salt and pepper. Ladle the soup into bowls and serve with parmesan grated on top.  Enjoy!


2 tablespoons olive oil

Marinara Sauce

Marinara Sauce

So far, we've had 2 more large batches of tomatoes come from the garden.  With those my dad and I tried our hand at marinara sauce.  I honestly didn't expect it to turn out that well.  I had tried to make my own tomato sauce one time in college and it was interesting to say the least.  I think my old roomie Erin can vouch for that one.  (Hi Erin!)  So with my expectations low, but my enthusiasm high, we un-boxed the Squeezo-Strainer.  I'm not kidding, that's really what it's called.  I was a bit skeptical at first, but I was assured that this was the same contraption that my parents used to make our baby food.  What can I say, they were (are) a couple of back to nature hippies.  (Gotta love them!)

There's no recipe because there's no way I was going to stop and measure all of the tomatoes that went into the sauce so you'll have to experiment with measurements on your own.  Here we go-

As with the Sun Dried Tomatoes below, start off with a whole bunch of ripe, washed and de-stemed tomatoes. 


Then start to process them through a food mill.  You may want to cut them in half to make it easier to grind.  Ladies and Gentlemen, I present to you, the Squeezo-Strainer!


In a large stock or pasta pot, saute 1-2 finely diced onions in about 1/4-1/2 cup olive oil, until translucent, bordering on carmelized.


If your going to peel and mince your garlic by hand, add about a head of it in now and cook with the onions for a few minutes.  Or you can do like I did and cut them in half (with skins and all) and send them through the food mill.  The mill will pulverize the garlic and remove the skins.  At this point you can start adding your tomato sauce, pulverized garlic, salt, pepper and herbs.  I used some oregano, thyme and italian parsley that I dried from my garden, but you can make it easy on yourself and just add some italian seasoning.


You may be tempted to check for seasoning now, like I made the mistake of doing (I hate raw tomatoes), but error on the side of less seasoning and wait to check for final seasoning until it's cooked down by almost half.  The flavors will concentrate and the flavor of the tomato will have changed as well.  The final product will be thick like your favorite jarred tomato sauce.  You can can the sauce with the traditional canning method, or you can put it into freezer bags, remove the air, and store in the freezer for months.  I have no canning experience, yet, so I chose the freezer option.  Enjoy!


Sun Dried Tomatoes


Sun Dried Tomatoes

Well, that might be a bit of a misnomer, since they're actually dried in the oven, but you get the idea.  We planted our first garden in our new house this year and ended up with a bumper crop of tomatoes.  This is the first batch which I made into sun dried tomatoes.  For a delicious way to use them, check out the Asparagus Penne Recipe posted earlier.  There's not really a recipe for the tomatoes, but I will at least walk you through my method.

First start out with a whole bunch of beautiful, ripe tomatoes.  I know, I went a little crazy with the pictures, but they were so beautiful I couldn't help myself.  I wish I liked raw tomatoes just so I can properly appreciate a juicy, ripe home-grown tomato, but alas, I can't stand them.  For now I'll have to live vicariously through Nate who eats them like candy.


Prepare your baking sheet by lining it with parchment paper.  I couldn't find my normal sheet pans so I had to cut rounds of parchment to fit into my dad's pizza pans.  Whatever works!


Wash and de-stem your tomatoes and either leave out to dry, or run a quick towel over them to take off any excess water.  Ok, I probably didn't need to show you a picture of washed tomatoes, but I couldn't resist taking another picture of them.  So pretty....


Slice the romas in half length-wise and any round tomatoes into about 1/4 inch discs.  Toss them into a bowl and coat with olive oil.


Lay them out in a single layer on your baking sheet with the cut side up.  Sprinkle with salt and pepper.  You can also add any other seasonings you like such as dried basil or italian seasonings.  For my first batch I went plain.


I set my oven for 150 degrees, but if yours won't go that low set it to it's lowest temperature.  Bake until dried but not crispy.  When mine came out I got so excited about canning them that I forgot to take a picture of the dried tomatoes on the baking sheet.  Oops.  So, we'll have to skip ahead to the final product.  When the tomatoes are cooked through you can either put them in a ziplock and store them in the freezer or do like I did and can them.  I didn't do the whole water bath thing, I just layered the tomatoes in a canning jar and then filled it with olive oil.  Use a chop stick or the blunt end of a skewer to try and get any air bubbles out.  It will keep longer if you do.  This is another point where you can add more flavor by throwing in a sprig of fresh rosemary or a couple garlic cloves, or even a few chili peppers, but I went with plain olive oil.  I read online that they'll keep like this for up to 2 months.  Enjoy!


Sorry guys, I'm still having problems with my computer.  I had just gotten my laptop back after having a new motherboard and power jack installed last week.  Then this weekend I was trying to post some of the recipes I had made and taken pictures of, when my computer started to randomly shut off.  All of my pics and recipes are on that computer.  So, now it's back to the repair shop.  Hopefully it's a minor problem and I'll be back up and running again soon.  Hang in there!